Tuesday, December 6, 2011

Basketry workshops

As mentioned in my last newsletter, I am now offering my first workshops in basketry.

A beginner myself, I want to start with something simple - more rustic than refined - and a couple of people have asked me to teach them how to make the willow garden globe.

There is a bit of basic weaving on that project and it is something that beginners can participate in.

I have scheduled the workshop for Saturday January 14, 2012 - see details under  "Events" at the top - and that workshop is already filled.
A second workshop will be held on Saturday January 21st, 2012.

Living willow workshops for the spring 2012 will be planned and posted on my blog in January. 


Words and photos by Lene Rasmussen,Willows.

Monday, December 5, 2011

Christmas Markets

Thank you to everyone who visited my  booths at The HandMade Market and The Artful Treasures Christmas Show during the past two week-ends.

It was fun to participate and the positive feedback from visitors who purchased items or showed interest in future workshops has been very encouraging.

In addition to the bird feeders I had produced a few baskets, mini hanging planters, willow globes and some Christmas items such as angels, stars, "twisters" (for use in outdoor planters), Christmas trees and wreaths - and it was a pleasure to talk to people about my business.

I am looking forward to participating in future markets - in the meantime: Look out for postings about planned workshops.

Words and photos by Lene Rasmussen,Willows.

Sunday, November 20, 2011

2011 Artful Treasures

The 2011 Artful Treasures Christmas show and sale in Niagara on The Lake is on December 2nd and 3rd from 10 am to 4 pm

The show is at the Pumphouse and held on the same week-end as the Christmas house tour in N-O-T-L

Take a trip to beautiful Niagara on The Lake and come and see me there!

Words and photos by Lene Rasmussen,Willows.

2011 Christmas HandMade Market

I have been busy preparing for the market, making
Baskets

Angels

Garden Globes
Wreaths
Stars
......and a few other things - come see me there!

Words and photos by Lene Rasmussen,Willows.

Wednesday, October 26, 2011

Flexible Willow Soaking Facility

When I was ready to use my first harvest of willow - dried for basketry - a couple of years ago, I decided to start small and my husband made me two pipes for soaking the willow.
The pipes are resting on a wooden frame in our utility room where the temperature is always around 20 degrees Celsius so it is not a problem to soak willow during the winter months. In the summertime I sometimes move the pipes outside in the sun where the temperature gets much higher which speeds up the whole process.
The pipes have screw caps in both ends. I open one end, fill the pipe with bundles to be soaked and cap the pipe again. Each pipe has a 5cm hole for filling it with water using my garden watering can and for emptying it again siphoning with a thin hose.

This has worked well except for the fact that the pipes are too small if I want to soak willow for more than one project. I really regret that I didn't invest in larger pipes as it can be a little tricky to get the bundles in and out when I stuff as much as possible in there.

This summer my resourceful husband made me a new, very flexible soaking facility.

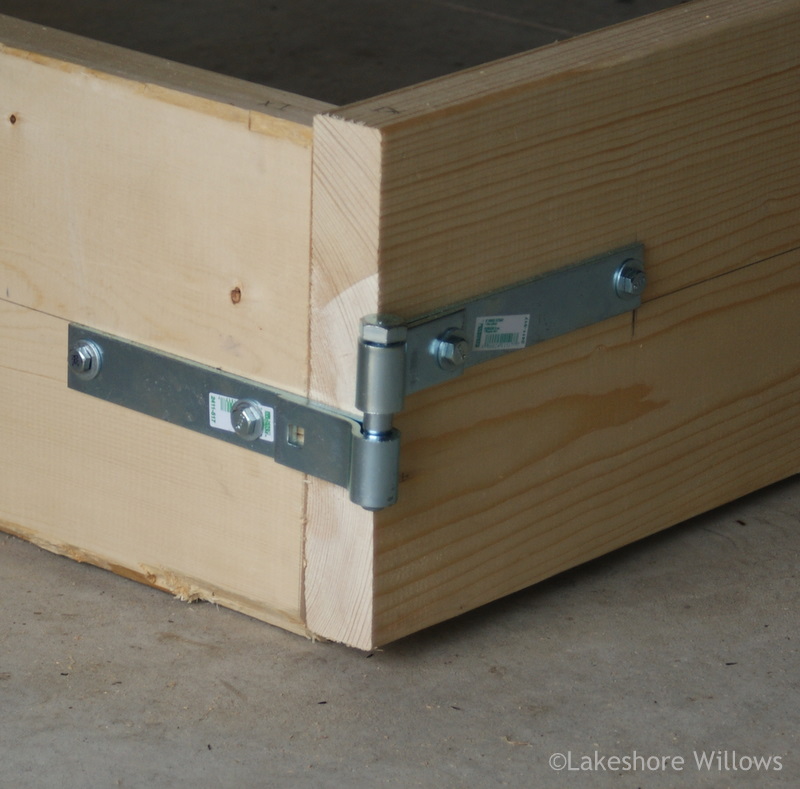
A wooden box that expands as needed. The sides of the box are 8 feet long and the ends are 1, 2 or 4 feet long. The height is 1 foot.
The boards are easily assembled with large bolts.


After the box is assembled, I line it with a double layer of 6 mill plastic. Then I ad just enough water to cover the bottom which makes it easy to smooth out the plastic into all the corners and I can fill it with as much water as needed.


Even though the frame is just 12 inches high, it is amazing how much willow can be soaked in the smallest box.


The willow is weighed down with a few large stones.
Several batches of willow can be soaked without changing the water. It is, however, easy to empty the container for water and afterwards the plastic can easily be cleaned outside on the lawn.

When not in use, the boards require minimal space for storage.

The Danish blog 'Piletossen' has a great, very thorough post about soaking willow. It is written in Danish, but I believe that you can use Google Translate with a decent result.
Words and photos by Lene Rasmussen,Willows.

Wednesday, September 28, 2011

Transplanting your potted willow tree to your garden

As the summer is slowly fading, the colours change and the leaves start to fall, it is time to transplant your potted willow tree to the garden - if you haven't done so yet.


When you first made your tree at our workshop (or bought it) in the spring, the willow rods didn't have any roots yet and you had to leave it in the pot to root and start growing.
It would look like the one in the photo on the left.

When the roots have developed during the summer, you can transplant it to your garden - and by this time of the year you have to do so. First of all the roots may not make it through the winter in the pot above ground, and secondly the woven tree is really 32 willow plants in that little pot - so it really wants to get some more room for its feet.

This morning - still a bit of fog in the air - a woven tree waiting to be planted looks like this one in the photo to the right.
Words and photos by Lene Rasmussen,Willows.

Friday, September 23, 2011

Living Willow Fence - one year later.......

Planting a woven Living Willow Fence has to be one of the fastest ways to create a living wall in your garden.
My woven fence was planted in the beginning of April 2010 and you can see what it looked like by the end of May that same year here.
After pruning in the fall - as I want to maintain the visibility of the shape of the fence - this is what it looked like in mid November the first year.

The following photos are from June this year, the fence being one year old.
If you are not interested in showing the weave, but would rather have a dense hedge, you can at this point weave all the long shoots into the structure.
We don't have a lot of trees on our property, but our neighbour does - and from early afternoon on the hedge is in shade. As you can see, it is doing just fine with the hours of sun that it gets daily.
On the North side of the fence, however the growth is more sparse and you can easily see the woven pattern even at this time of the year. To maintain the fence - so that it doesn't get lopsided - it is important to either prune it at least once (better twice) annually or continually weave any new growth into it.
By the end of July this second growing season the look is very full and the fence is ready for another pruning.
Words and photos by Lene Rasmussen,Willows.