Showing posts with label Salix 'Americana'. Show all posts

Thursday, September 10, 2015

Repairing an antique doll's carriage


A basketry guild that I am a member of forwarded a mail to all members from the owner of an antique doll's carriage.
She was looking for someone to help repair the buggy as her 3 year old daughter unsuccessfully had tried to enter it and thus put her foot through it a couple of places.

I wasn't sure that I would be able to do the job, but was willing to take a look at it and responded to the mail. It turned out that the owner lived just about 30 minutes drive from here and she came to see me with the buggy.
My first impression was that it was made using flat reed. As I only do work with natural willow I showed the owner examples of baskets the weave of which would be similar on the buggy if I did the job, and she was excited to have me try to not fix or repair, but replace the weave.
So after a few days I contacted her with a quote as I had decided what/how to do.
The original cover had been cut to fit from a woven sheet and attached to the frame with multiple nails. Then another strip was attached to cover the nails and ends of the weave - using nails. As can be seen on the first of these images, the weave had been painted at least 3 times: pink, blue and the last cote white.
Removing the original cover was a much bigger job than I had anticipated, but I got it off. Interestingly enough it turned out that the material used for the weave was PAPER. Fairly heavy paper folded twice and the stakes were paper that was rolled so that it resembled round reed.
The owner had chosen Salix x 'Americana' for the weave and we decided to paint the frame black which would suit the darker green colour of the willow.
For the basket part of the buggy I drilled holes under the bottom of the frame for my stakes.


Turning the stakes out and around the frame and tying them made it possible for me to weave the sides of the buggy so that the "basket" fit snug around the frame all the way around. 

For further stability and a bit of interest I tied willow around the edge at a point on both sides.
Now to the canopy!
The owner had given me permission to make changes and the two "windows" in the canopy weren't going to be incorporated in the new design.
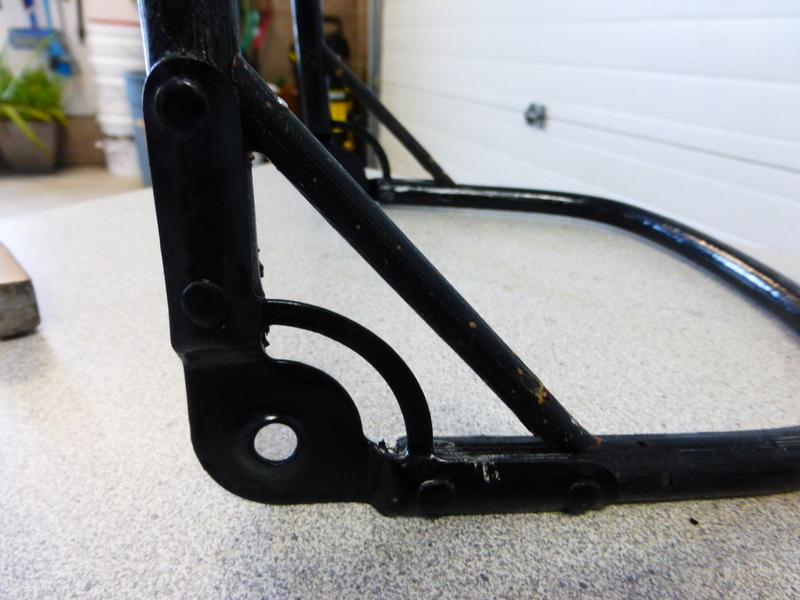
A square, cracked peg inserted to hold the top frame in place - and to which the original weave was nailed - was replaced with a piece of a willow rod that was naturally black.
To make it all come together I turned the weave around (in the original it appeared that the "stakes" would run from front to back) and wove the canopy as a "frame basket" starting in the middle of the inserted willow piece. 

And the final appearance.

Words and photos by Lene Rasmussen,Willows.

Friday, September 23, 2011

Living Willow Fence - one year later.......

Planting a woven Living Willow Fence has to be one of the fastest ways to create a living wall in your garden.
My woven fence was planted in the beginning of April 2010 and you can see what it looked like by the end of May that same year here.
After pruning in the fall - as I want to maintain the visibility of the shape of the fence - this is what it looked like in mid November the first year.

The following photos are from June this year, the fence being one year old.
If you are not interested in showing the weave, but would rather have a dense hedge, you can at this point weave all the long shoots into the structure.
We don't have a lot of trees on our property, but our neighbour does - and from early afternoon on the hedge is in shade. As you can see, it is doing just fine with the hours of sun that it gets daily.
On the North side of the fence, however the growth is more sparse and you can easily see the woven pattern even at this time of the year. To maintain the fence - so that it doesn't get lopsided - it is important to either prune it at least once (better twice) annually or continually weave any new growth into it.
By the end of July this second growing season the look is very full and the fence is ready for another pruning.
Words and photos by Lene Rasmussen,Willows.

Monday, November 29, 2010

Salix x 'Flame' flaming in the November sun!

Sometimes you just have to post repeatedly about a subject - like the colours of the willow branches, intensifying after some frosty nights, and amplified by late afternoon sun.
The colours in the field looked so inviting from the house that I decided to walk out and try to capture some of it. Above is Salix x 'Flame' on November 11, 2010 burning in the late afternoon sun.

Salix x rubens 'Hutchinsons Yellow' - true to its name somewhat more yellowish - stunning.

Salix 'Americana' had taken on a beautiful brown colour with a touch of pink.


Interesting enough Salix koriyanagi 'Rubykins' still had all green leaves, standing tall, slim, and beautiful, the rods a bright green with some rosy cheeks.

Time for harvesting has arrived - at least for some varieties.

Words and photos by Lene Rasmussen,Willows.

Tuesday, August 31, 2010

Pruning to renew growth, shape

The Twisted Willow trees and the Harlequin trees that we made in the spring need a bit of maintenance to keep looking their best.
You want the plants to appear like a tree - with a trunk and a crown - but as the rods that we planted start to root and grow, they will naturally set shoots along the length of the rods. The shoots on the "trunks" of the trees have to be pinched off during spring and  summer to keep the shape of the trees while the shoots in the top are allowed to grow. If you fail to do so, you will end up with a very bushy shrub in the pot.
Keeping the twisted trees (from left: Salix x 'Flame, S. 'Americana', S. integra 'Hakuro Nishiki', and S. x acutifolia) free from shoots on the "trunk" is fairly easy as you basically just rub your hand down the trunk while the shoots are small. As you may see on the photos, the different varieties have different habits as to how many shoots they grow and how easily they are pinched off.
The Harlequin tree takes much more work and the variety in the picture, S. koriyanagi 'Rubykins' will have a lot of shoots in the spring and early summer with fewer shoots continuing to show up during the rest of the growing season and the following years.


In the photo to the left I have removed all the shoots and the trunks look clean and smooth.
When pinching off the shoots it is important to be careful not to damage the bark on the tree. If the shoot has been left too long you may rip some of the bark off if you "rub" or pull on the shoot - risking that that particular willow rod will die. If the shoots have been allowed to grow too big, it is a good idea to pinch them off with your finger tips or cut them off with a small pruning tool.

As the plants grow, you will also like to encourage the crowns to "fill in", get bigger and fuller. This is accomplished by pruning the crown a few times during the summer - starting when the individual shoots in the crown are about 25 cm long, cutting off about 10 cm.

On the left are the trees before pruning - I was late with the first pruning this summer - and on the right the same tree after it has been pruned.
The top tree is S. x acutifolia


The bottom tree is S. koriyanagi 'Rubykins'

They look a little "stunted" right after this operation, but the plants respond by developing two or more new shoots for each tip that has been cut off and after a few weeks you will have a larger, bushier crown.

This is what my very first Harlequin tree looks like now, planted in the garden.


Tuesday, May 25, 2010

Living Willow Fence update

The Living Willow Fence was installed April 5-6, 2010 and 7 weeks later is looking fresh and green.
It looks like all rods are rooting and growing, filling in nicely. As the area where I planted it is low and moist (if not wet) unless we are in a period of drought, I haven't had to water it yet and the last couple of weeks of warm and sunny weather really got it going.

I know that as the fence grows and matures it will develop into a beautiful feature in my garden. Look for another update at the end of the summer.


Words and photos by Lene Rasmussen,Willows.

Monday, May 10, 2010

Living willow Fence + Hedge = Fedge

Five weeks ago I installed a Living Willow Fence in my garden.
The British expression for this is "Fedge", but "Living Willow Fence" sounds much better in my ears. You could argue that it is a hedge - it has to be trimmed twice annually to keep the pattern visible and to maintain even growth - yet, it has some fence characteristics, as it is woven.

This living willow fence separates my hosta garden/pond area from the front part of the property and will eventually provide some shelter from the wind while forming a decorative divider.
As I like the woven pattern to remain visible, this construction will never become a "privacy fence". If you like the fence to become more dense, you could weave new growth in between the existing pattern (rather than trimming it off) - but in that case, why not just plant a traditional hedge?


When you search for information about a Living Willow Fence or Fedge, you will realize that there are many different ways of making one. Some like it to be very rustic or country like, others like it to be more refined. I am using the technique that has become popular in Denmark (they call it a Belgian fence) and that is shown in the book "Pilehegn" (Willow fences) by Jette Mellgren.

We have a lot of strong winds here, so I decided to make a "double" fence, which makes for a stronger, denser, and more beautiful fence. The same kind of living willow fence can be made with single or even triple rods if desired.


At the ends of the fence a heavier rod is required for strength and I have used a "twisted tree" like the ones we made at the workshops here in April.
If I so desire, I can leave the top to grow as a tree - or I can just trim it to the same height as the fence - how great it is to have options!
In the photo you can see how the rods are woven together and around the end rod. Over time the rods will fuse together at the points where they meet and create a very unique fence, hedge, fedge!
To hold the rods in place now, I have used cable zip ties at the crossings halfway from the ground and at the top. As the willow grows, I will cut off the ties so that they will not hurt the willows.
Different willow varieties will make fences with different appearances - although the frame will be the same - just like different kinds of trees look different - although they all have trunks and crowns. I have used Salix 'Americana' for this fence and the first shoots have been growing for the past couple of weeks. I will post an update later this summer, showing how the living willow fence develops.
A Living Willow Fence can be installed after the ground thaws and until the end of April.
Well in time for next year's planting season, I will have information posted about varieties available for living fences, kits, ordering, shipping, installation by me etc.
Words and photos by Lene Rasmussen,Willows.

Sunday, April 25, 2010

Workshop fun!

We had three workshops here in April and I believe that everyone - not just me - had great fun. I met some really wonderful fellow gardeners, people enthusiastic about doing something different and I have received a lot of positive feed-back.
My friend, garden writer, author Yvonne Cunnington posted about her woven willow creation on her blog. Garden writer, editor and Master Gardener, Lorraine Flanigan was spreading the word about Living Willows at a presentation at Bolton Horticultural Society. Claudette Sims, a  Halton Master Gardener would like to be able to show fellow master gardeners some willow workshops next spring. Judy and Caroline are arranging a group visit here later and I have several people expressing interest for next year's workshops already.
Salix integra 'Hakuro Nishiki' (Japanese Dappled Willow) was a popular choice of variety for the twisted tree.
'Hakuro Nishiki' is a beautiful willow at all stages. The photos show (from left to right) how the foliage changes during the summer. When the new leaves start to unfold, they are a tender cream and green (sometimes a pinkish white), but then, for about 4-6 weeks in June-July, the tips of the shoots are a stunning pink. We have even had hummingbirds hoovering at the plants, thinking that they were flowers to feast on. Later in the summer the leaves are green with big splashes of creamy white and some coppery tones on some of the tips of the branches.

Salix x acutifolia - shown on these photos - was also available for the twisted tree. The bright colours on willow stems are only showing on new, one year old branches. On most willow varieties the older branches turn various colours of green or brown, but this one is quite different. The photo on the left shows the dark burgundy colour on the rods just after harvest in the spring (so they are still one year old). Soon after the new growing season starts, a white bloom is covering the stems and they stay like that for the rest of the season to turn almost black come spring. The photo on the right is a close up of the plant in summer - the new shoots bright red while the older wood on "the trunk" is white.

Salix x 'Flame' was picked for a couple of twisted trees, and Salix koriyanagi 'Rubykins' - in this photo - and Salix 'Americana' were available for both the twisted tree and the harlequin tree.
Thank you all for participating, for the great feed-back, and for your enthusiasm for "Willows". Thank you Lorraine for allowing me to use some of your photos from the workshop.
Words and photos by Lene Rasmussen,Willows.

Tuesday, April 6, 2010

Pussy Willows?

At the end of winter/start of spring some willows are among the earliest bloomers, providing nectar for the "early bird" - or should I say the early bee and other insects hunting for food seemingly long before any flowers are around.
For many people "Pussy Willows" are a sure sign of spring and a few branches with the fuzzy little catkins are picked for a vase.
What is a "Pussy Willow"? Some sources name the North American native willow Salix discolor and Salix caprea (Goat Willow, native to Europe and parts of Asia) as being pussy willows while other sources ad other Salix species under the title. In your mind, do you think "Salix discolor" when you hear pussy willow? or just any willow, blooming with catkins?
When you grow willows for basketry and/or cuttings, you most often harvest the rods before any catkins are visible, but this winter we had lots of snow in the field, so when spring "suddenly" came a few of my willows started to show their beautiful catkins.

These are from some "wild" willows that I have, maybe one of them is Salix discolor.

Salix dasyclados

Salix 'Americana'

Salix koriyanagi 'Rubykins'

Salix sachaliensis 'Sekka'
 
Salix viminalis
My Salix acutifolia doesn't show any catkins, but take a look at the blogpost about them at my blogger friend Vivian (Piletossen) - they almost look unreal.

Words and photos by Lene Rasmussen,Willows.