Friday, December 31, 2010

Winter Planters with Willow

This year I chose to decorate my winter planters using willow as the main material.

The planters at the back door each has 10 large branches of the curly willow, Salix x 'Red Corkscrew Willow' placed in the middle.  
To complement the yellow and orange colours I made wreaths of Salix dasyclados and S. sachaliensis 'Sekka' and placed them on the edges of the planters.
It was easy and I like the look - although I might have added a few, small green branches had the soil not been frozen by the time I started to work on the planters - I was lucky to get the willow rods in place before the soil was too hard.


The low, black planters at the front door are filled with branches of Salix x 'Flame', a few S. sachaliensis 'Sekka' (Japanese Fantail willow), and "sprigs" of evergreens.

As we do not have Christmas lights on the house, we decided to wrap two very large wreaths and three big stars - made with fresh rods of Salix dasyclados - with strands of clear mini lights and hung them at the front of the house over the holiday. It looked great and I will have to take photos to show next year.

Salix x acutifolia is interesting with a white bloom on the dark wine coloured stems and I  used it as decoration on my advendt wreath this year - looking beautiful along with light purple ribbons. As I made a couple of Christmas decorations for the table, I also added a few stems for interest.

It is the last day of 2010 and I wish you all a Happy New Year with good health and lots of laughter.

Words and photos by Lene Rasmussen,Willows.

Monday, November 29, 2010

Salix x 'Flame' flaming in the November sun!

Sometimes you just have to post repeatedly about a subject - like the colours of the willow branches, intensifying after some frosty nights, and amplified by late afternoon sun.
The colours in the field looked so inviting from the house that I decided to walk out and try to capture some of it. Above is Salix x 'Flame' on November 11, 2010 burning in the late afternoon sun.

Salix x rubens 'Hutchinsons Yellow' - true to its name somewhat more yellowish - stunning.

Salix 'Americana' had taken on a beautiful brown colour with a touch of pink.


Interesting enough Salix koriyanagi 'Rubykins' still had all green leaves, standing tall, slim, and beautiful, the rods a bright green with some rosy cheeks.

Time for harvesting has arrived - at least for some varieties.

Words and photos by Lene Rasmussen,Willows.

Friday, October 15, 2010

Weaving for the garden and the birds

At the willow weaving class in June I had a chance to  meet a few of the members of the Southwestern Ontario Basketry Guild and it was a wonderful opportunity for me to get to know people with an interest in willow.

One of the girls, Janice joined my friend Frances and me for a couple of days of weaving here at Lakeshore Willows, where Janice and I benefited from Frances' great experience in willow weaving.

We used entirely left over willow from the above mentioned class in June - dried, then soaked willow kept in a freezer by Frances since June - and Frances was happy to see most of the willow finally transformed into something useful.

Both Janice and Frances have added wonderful posts to their blogs about our "Basket Camp" where you can read more about the experience.
This garter snake decided to pay us a visit in the garage. I was very surprised that he actually came right into the garage where we were working on the baskets - AND both dogs were there too. Maybe because it was a very hot day, but I quickly got him outside again - I really don't like snakes, even the harmless ones, and definitely not in the house. Really, since that day I catch myself checking for any movement whenever I step into the garage from the house!
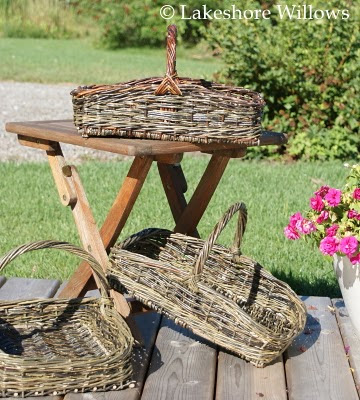
Our finished garden baskets displayed on the deck.
Frances did a great job teaching us the techniques that were a great challenge for both Janice and me - especially to scallom and insert the stakes.
My basket in use - I just harvested the last big bunch of tomatoes a couple of days ago.
Our next project were bird-feeders. Here's Janice working on the base - Frances "lending a helping hand"
Our final products.

I think they look pretty good, considering they were our first attempts, helping each outer and following written instructions.


Words and photos by Lene Rasmussen,Willows.


Tuesday, August 31, 2010

Pruning to renew growth, shape

The Twisted Willow trees and the Harlequin trees that we made in the spring need a bit of maintenance to keep looking their best.
You want the plants to appear like a tree - with a trunk and a crown - but as the rods that we planted start to root and grow, they will naturally set shoots along the length of the rods. The shoots on the "trunks" of the trees have to be pinched off during spring and  summer to keep the shape of the trees while the shoots in the top are allowed to grow. If you fail to do so, you will end up with a very bushy shrub in the pot.
Keeping the twisted trees (from left: Salix x 'Flame, S. 'Americana', S. integra 'Hakuro Nishiki', and S. x acutifolia) free from shoots on the "trunk" is fairly easy as you basically just rub your hand down the trunk while the shoots are small. As you may see on the photos, the different varieties have different habits as to how many shoots they grow and how easily they are pinched off.
The Harlequin tree takes much more work and the variety in the picture, S. koriyanagi 'Rubykins' will have a lot of shoots in the spring and early summer with fewer shoots continuing to show up during the rest of the growing season and the following years.


In the photo to the left I have removed all the shoots and the trunks look clean and smooth.
When pinching off the shoots it is important to be careful not to damage the bark on the tree. If the shoot has been left too long you may rip some of the bark off if you "rub" or pull on the shoot - risking that that particular willow rod will die. If the shoots have been allowed to grow too big, it is a good idea to pinch them off with your finger tips or cut them off with a small pruning tool.

As the plants grow, you will also like to encourage the crowns to "fill in", get bigger and fuller. This is accomplished by pruning the crown a few times during the summer - starting when the individual shoots in the crown are about 25 cm long, cutting off about 10 cm.

On the left are the trees before pruning - I was late with the first pruning this summer - and on the right the same tree after it has been pruned.
The top tree is S. x acutifolia


The bottom tree is S. koriyanagi 'Rubykins'

They look a little "stunted" right after this operation, but the plants respond by developing two or more new shoots for each tip that has been cut off and after a few weeks you will have a larger, bushier crown.

This is what my very first Harlequin tree looks like now, planted in the garden.


Tuesday, July 6, 2010

Rib Style Basket Making

I was fortunate to attend four days of willow weaving classes last month - my first in Rib Style basket making (so for those who have followed my blog, yes it was my second willow weaving class ever) - and we were going to make four different baskets.
The classes were taught by Jo Campbell Amsler of Willow Ridge Basketry who specializes in Rib Style baskets woven with willow and other natural weaving materials. Above is a selection of some of the beautiful baskets made by Jo which she brought to the classes. For information about Willow Ridge Basketry, the accomplishments of Jo, and upcoming classes, click on the link above.
On the first day we were taught a traditional "Gypsy Melon Basket" using some of the techniques the traveling Gypsies used when traveling from community to community selling their baskets. Most of us didn't quite finish our baskets during class and as we didn't want to go home with unfinished baskets, four of us (staying at the same inn) worked on finishing it in one of our rooms that night.

My "Gypsy Melon Basket" made with rods from Salix koriyanagi 'Rubykins' from my field. I have decided that this is going to be my "tool basket". Not too big, but big enough - and very cute.

My "Wisteria Bowl" made over a rim created by twisting wisteria wines into a circle (holding it in place till it has dried). I chose to make it rather shallow, almost tray-like. The weaving material is a combination of various willow weavers and thinner wisteria wines. It was fun to "feel" the nature of the different materials as I don't have any former experience weaving with natural materials.                                                                   
My favourite basket was the "Willow Ridge Herb Basket", taught on the third day. For this basket I decided to try using "fresh, frozen, thawed" willow rods for weaving. I had (naturally, with my lack of experience) never tried that, but Jo uses fresh (or fresh, frozen) willow for most of her baskets and told me that for the rib style baskets it doesn't make much of a difference and you don't have to worry about drying and soaking the rods - you always have weavers ready to go. That is, of course, if you have lots of freezer room for willows. It definitely had another feel to it.
Our last basket - the "Charm Basket" - was a smaller basket, thus much less room to work the weavers and because of that it was not - as I had expected - the easiest of the baskets to make. It is called "Charm Basket" as small charms are attached to the ends of the handle, dangling. I didn't attach any yet, but in the top collage - middle, right - you can see one of Jo's baskets with charms of tiny pieces of driftwood, willow beads, acorn "tops" etc.
Very few willow classes are offered in North America and none here in Ontario (not that I have been able to find) and am so happy that I found the Southwestern Ontario Basketry Guild who sponsored these classes with Jo Campbell Amsler. I hope that the interest in willow weaving will increase so that we will have an opportunity to attract other instructors to teach us their willow weaving techniques.


Words and photos by Lene Rasmussen,Willows.

Thursday, June 10, 2010

Wickerwork and Willow - a "New Trend"?

An on-line journal "The Statement" - The monthly e-zine for the professional designer - has published an article about wickerwork and willow under ideas for design, featuring an image and link to my blog.
I am always excited when some of the many uses of willow are promoted as I, obviously, believe there is a great potential, not only in traditional basket making, but also in modern art and design.

Words and photos by Lene Rasmussen,Willows.

Tuesday, May 25, 2010

Living Willow Fence update

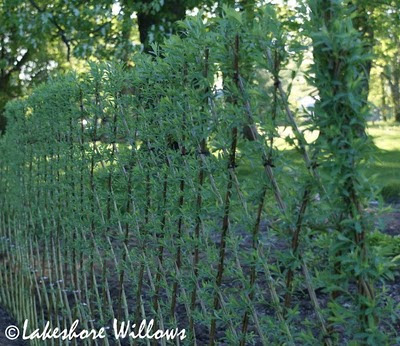
The Living Willow Fence was installed April 5-6, 2010 and 7 weeks later is looking fresh and green.
It looks like all rods are rooting and growing, filling in nicely. As the area where I planted it is low and moist (if not wet) unless we are in a period of drought, I haven't had to water it yet and the last couple of weeks of warm and sunny weather really got it going.

I know that as the fence grows and matures it will develop into a beautiful feature in my garden. Look for another update at the end of the summer.


Words and photos by Lene Rasmussen,Willows.

Sunday, May 23, 2010

Blue Eyed Grass

Last year - while weeding one of my garden beds - I noticed this grass-like "weed" and decided to leave it there. I wasn't quite sure, but hoped it might be Blue Eyed Grass.

This spring it has increased in volume and for the past week or so it has been blooming. There are several species of this Ontario native, but I believe this is the Common Blue Eyed Grass (Sisyrinchium montanum). Each flower only lasts one day, but I have been lucky that this little plant (about 20 cm tall) has produced an abundance of blooms. It belongs to the Iris family and as such - on closer inspection - has the same type of flat, pressed together leaves and when it isn't blooming, it forms a neat little blueish-green tuft.
It hope it will like it here and multiply. 

Words and photos by Lene Rasmussen,Willows.

Monday, May 10, 2010

Living willow Fence + Hedge = Fedge

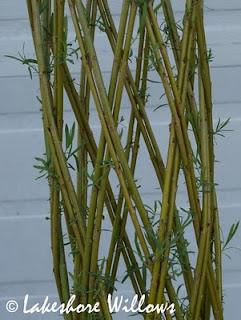
Five weeks ago I installed a Living Willow Fence in my garden.
The British expression for this is "Fedge", but "Living Willow Fence" sounds much better in my ears. You could argue that it is a hedge - it has to be trimmed twice annually to keep the pattern visible and to maintain even growth - yet, it has some fence characteristics, as it is woven.

This living willow fence separates my hosta garden/pond area from the front part of the property and will eventually provide some shelter from the wind while forming a decorative divider.
As I like the woven pattern to remain visible, this construction will never become a "privacy fence". If you like the fence to become more dense, you could weave new growth in between the existing pattern (rather than trimming it off) - but in that case, why not just plant a traditional hedge?


When you search for information about a Living Willow Fence or Fedge, you will realize that there are many different ways of making one. Some like it to be very rustic or country like, others like it to be more refined. I am using the technique that has become popular in Denmark (they call it a Belgian fence) and that is shown in the book "Pilehegn" (Willow fences) by Jette Mellgren.

We have a lot of strong winds here, so I decided to make a "double" fence, which makes for a stronger, denser, and more beautiful fence. The same kind of living willow fence can be made with single or even triple rods if desired.


At the ends of the fence a heavier rod is required for strength and I have used a "twisted tree" like the ones we made at the workshops here in April.
If I so desire, I can leave the top to grow as a tree - or I can just trim it to the same height as the fence - how great it is to have options!
In the photo you can see how the rods are woven together and around the end rod. Over time the rods will fuse together at the points where they meet and create a very unique fence, hedge, fedge!
To hold the rods in place now, I have used cable zip ties at the crossings halfway from the ground and at the top. As the willow grows, I will cut off the ties so that they will not hurt the willows.
Different willow varieties will make fences with different appearances - although the frame will be the same - just like different kinds of trees look different - although they all have trunks and crowns. I have used Salix 'Americana' for this fence and the first shoots have been growing for the past couple of weeks. I will post an update later this summer, showing how the living willow fence develops.
A Living Willow Fence can be installed after the ground thaws and until the end of April.
Well in time for next year's planting season, I will have information posted about varieties available for living fences, kits, ordering, shipping, installation by me etc.
Words and photos by Lene Rasmussen,Willows.
Tuesday, May 4, 2010

Eastern Milk Snake


A "snake person" I am not! But I have learned to accept their presence and understand that in many ways they are "a gardener's friend".
Most of the snakes I've seen here are Garter Snakes. You can see how we "rescued" one last winter here and here, but the first one I saw this year is this one. I have identified it as an Eastern Milk snake (but if anyone has any other suggestions, please tell me).

I didn't measure it, but my guess is that he was about 75 cm long and slender. He didn't move around much, probably because it was too cold still  - although the sun was out.

Sunday, April 25, 2010

Workshop fun!

We had three workshops here in April and I believe that everyone - not just me - had great fun. I met some really wonderful fellow gardeners, people enthusiastic about doing something different and I have received a lot of positive feed-back.
My friend, garden writer, author Yvonne Cunnington posted about her woven willow creation on her blog. Garden writer, editor and Master Gardener, Lorraine Flanigan was spreading the word about Living Willows at a presentation at Bolton Horticultural Society. Claudette Sims, a  Halton Master Gardener would like to be able to show fellow master gardeners some willow workshops next spring. Judy and Caroline are arranging a group visit here later and I have several people expressing interest for next year's workshops already.
Salix integra 'Hakuro Nishiki' (Japanese Dappled Willow) was a popular choice of variety for the twisted tree.
'Hakuro Nishiki' is a beautiful willow at all stages. The photos show (from left to right) how the foliage changes during the summer. When the new leaves start to unfold, they are a tender cream and green (sometimes a pinkish white), but then, for about 4-6 weeks in June-July, the tips of the shoots are a stunning pink. We have even had hummingbirds hoovering at the plants, thinking that they were flowers to feast on. Later in the summer the leaves are green with big splashes of creamy white and some coppery tones on some of the tips of the branches.

Salix x acutifolia - shown on these photos - was also available for the twisted tree. The bright colours on willow stems are only showing on new, one year old branches. On most willow varieties the older branches turn various colours of green or brown, but this one is quite different. The photo on the left shows the dark burgundy colour on the rods just after harvest in the spring (so they are still one year old). Soon after the new growing season starts, a white bloom is covering the stems and they stay like that for the rest of the season to turn almost black come spring. The photo on the right is a close up of the plant in summer - the new shoots bright red while the older wood on "the trunk" is white.

Salix x 'Flame' was picked for a couple of twisted trees, and Salix koriyanagi 'Rubykins' - in this photo - and Salix 'Americana' were available for both the twisted tree and the harlequin tree.
Thank you all for participating, for the great feed-back, and for your enthusiasm for "Willows". Thank you Lorraine for allowing me to use some of your photos from the workshop.
Words and photos by Lene Rasmussen,Willows.